 Symbi Biological
Water Usage for 2017
Below is the amount of rainwater I used in 2017. The system volume total is about 4000 gallons, so it’s kind of interesting that it is somewhat close to the total used all year long. This was the first year of using only rainwater. I decided to collect rainwater to illustrate the amount used and, more importantly, be more water efficient instead of pulling from our well. The sodium content of our well water is about 240ppm of Na and that is way too high. The plants seem to be much happier now that it is down to about 25ppm. I may start adding some well water again to supplement Ca, but will keep an eye on the Na.
| 1/4/17 | 180 | Flush | Rainwater |
| 1/23/17 | 100 | Flush | Rainwater |
| 2/16/17 | 518 | flush | Rainwater |
| 3/4/17 | 286 | Flush | Rainwater |
| 3/18/17 | 125 | Rainwater | |
| 4/21/17 | 415 | Flush | Rainwater |
| 5/8/17 | 150 | Rainwater | |
| 5/11/17 | 420 | Flush | Rainwater |
| 5/18/17 | 80 | Rainwater | |
| 5/25/17 | 185 | Flush | Rainwater |
| 5/30/17 | 200 | Flush | Rainwater |
| 6/16/17 | 140 | Flush | Rainwater |
| 7/6/17 | 200 | Flush | Rainwater |
| 7/20/17 | 140 | Flush | Rainwater |
| 7/28/17 | 80 | Flush | Rainwater |
| 8/8/17 | 170 | Flush | Rainwater |
| 8/11/17 | 166 | Leak | Rainwater |
| 9/1/17 | 120 | Rainwater | |
| 9/8/17 | 70 | Rainwater | |
| 9/12/17 | 130 | Flush | Rainwater |
| 9/29/17 | 100 | Rainwater | |
| 10/6/17 | 100 | Rainwater | |
| 10/16/17 | 250 | Flush | Rainwater |
| 11/1/17 | 263 | Flush | Rainwater |
| 11/13/17 | 71 | Rainwater | |
| 11/22/17 | 230 | Flush | Rainwater |
| 12/4/17 | 200 | flush | Rainwater |
| 12/4-17 | 200 | Flush | Rainwater |
| 12/17/17 | 50 | Rainwater | |
| 2017 Total | 4821 | Rainwater |
Aquaponics Filtration:Mineralization and Biofilter Tanks
 The new filtration is working out really well. As previously posted, the Settling Well is settling well! The next step in the filtration is a 50-gallon cone bottom tank to act as the mineralization tank filled with Kaldness media inside.
  About 40% of the volume of the tank is filled with media. The Kaldness media provides a lot of surface area for bacteria to mineralize some of the solids that slip through the Settling Well. When redesigning the system, I wanted to use parts we already had on site. The cone bottom tank is perfect for this part of the filtration as it is easier to clean out than the 50-gallon barrels that we also have. Since this tank is static, it is cleaned out a lot more often than the biofilter, so I thought the cone bottom would be best for mineralization. The screened piping works great for the inlet and outlets.
  It is very important to close off the ends of the screen pipe so that the media doesn’t collect inside clogging the flow. When my mineralization tank started overflowing, this was the reason. I used zip ties to close them off, but I’m sure there are other methods that would work just as well.There is an array of 6 airstones that is submerged all the way down to where the cone part starts toward the bottom of the tank. The airstone array helps agitate the media when it is time to clean out the tank every two weeks or so. Something I forgot to do before adding the media was add some sort of screened standpipe so when I drain the mineralization tank all of the media stays in the tank. For this purpose, I use some of the screen pipe as shown in the photo. When I am ready to drain the tank, I shove the screen pipe down into the drain at the bottom of the cone and it keeps the media from escaping. When I want to clean the tank, I open up the air to the airstones and let the turbulence bring most of the solids into suspension and then open the drain. After I put the screen pipe in of course! You only have to make that mistake once and then picking up a billion pieces of plastic starts drive the point home! In the future, I hope to connect this drain to another tank to keep the solids that drain out so that we can mineralize that material even more.
Following the mineralization tank is the biofilter. Using the same media, I filled it to about 60% volume. The biofilter is a 50-gallon barrel and is actively aerated with the same airstone array as the mineralization tank.  The aeration helps to keep the media agitated, grinding whatever made it past the mineralization into finer suspended solids that eventually get consumed somewhere in the system by bacteria or something like the ostracods (seed shrimp) that inhabit the system.
From there, the water goes into the sump and out to the plants after going through a UV sterilizer to decouple the fish system from the vegetables.
Aquaponics Filtration Improvements
We made several changes to the aquaponics filtration system. Here’s a video showing the full scope of the new components added. I will have individual posts of the components to share the details of what we did and why. If you have any questions, please reach out to me at doug@tomkatranch.org.
Aquaponics Filtration: Settling Well
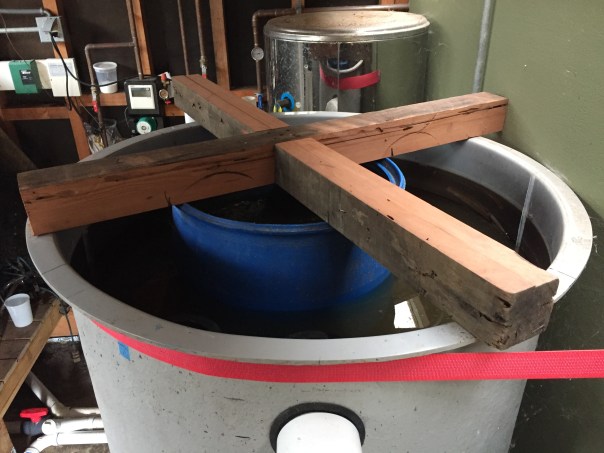
Well that settles it. At least, I hope it does. We are upgrading the aquaponics system to improve the filtration part of the system along with some other minor changes. It seems like the Settling Well design is the way to go for the first step in our filtration. In our first design, we used a baffle in our clarifier to settle the solids, but it never really performed the way we had hoped providing the humorous observation that it provided “baffling clarification”—meaning it didn’t work very well. My guess is that the solids would settle, but some of the finer solids would then get picked up by the flow of the passing water, so it never really worked the way we wanted. It filtered, but also sort of unfiltered in a way. With that observation, we pulled the baffle out of the 250 gallon cone bottom tank to change over to a swirl filter design. This was an improvement, but still not performing ideally. I imagine both technologies are valid with proper engineering, but we were copying what we saw elsewhere and figured it would work.

Barrel inside the cone bottom tank. Inlets bring water here to settle.
When redesigning our aquaponics system, it was important to reconsider the radial design and look at something else. We decided on the settling well design after consulting with Huy Tran and it is doing pretty good job as the first line of filtration. Just for the simple fact that the turbulence within the cone bottom tank is now minimized allowing solids to truly settle. As the system redesign is completed, I will share the rest of the changes and look forward to seeing how they perform.
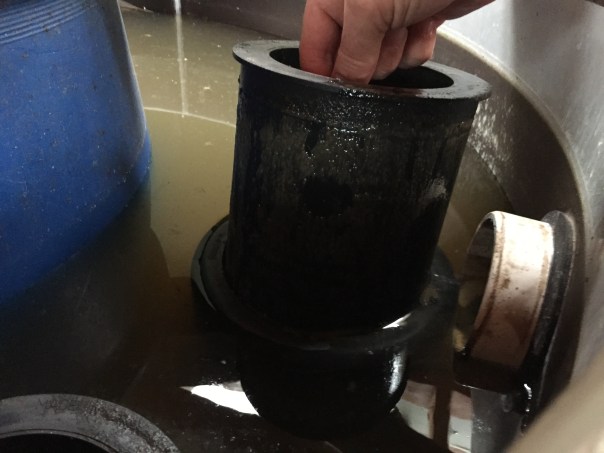
Pulling out net pot inside one of the two skimmers that take the water to the next step in filtration.
Volunteer Integrated Pest Management—Ladybug Larva
We’ve got some aphid eating volunteers visiting the aquaponics greenhouse for the third year in a row. This video is of a lady bug larva on one of the lettuce leaves. They like to eat aphids and other soft bodied sap sucking insects you may find in your greenhouse. You’ve probably seen ladybugs for sale at your local nursery as part of an Integrated Pest Management program. If you’re lucky enough, they might show up for free depending on where you live! Our region near the California coast seems to be a particularly attractive place for them. The University of California Agricultural and Natural Resources says the adults typically over winter somewhere cold like in the Sierra Nevada Mountains. The cool temps lower their body temperature slowing their metabolism so they can live off their body fat until it warms up. In Spring, they head west to the coastal and valley areas of California to find food and eventually lay eggs. It’s always interesting when they find the greenhouse. There is rarely a shortage of aphids inside! I wish they would stay for longer, but they usually leave after a short stay. Lady bugs are great for integrated pest management, but you should always consider that they do look for greener pastures fairly quickly. That’s why I tend not to buy them for IPM since it seems they stick around for only a short snack and then go looking for something else. That said, they’re always welcome to a feast anytime they find us. Bon appetite! Or, should I say, Bon aphidtite!
Aeration and Crud

Aerating your deep water culture beds is a really good idea for more than just the obvious reason of keeping your plant roots healthy—it also helps keep your system water clear. Introducing oxygen to the trough sustains healthy root development in the aqueous conditions with ideal levels being at about 8ppm of DO or dissolved oxygen. The plants will grow at lower levels, but so will other things potentially opening up your system to disease and other issues. Clearly, healthy plants mean a better harvest with fewer pests and a more natural disease resistance. But also, from a food safety perspective, keeping the beds active and moving is a better way to ensure there aren’t pockets of anaerobic sludginess building up in your system. The sludge buildup can cause a host of problems from increasing BOD (biological oxygen demand) of the system to physically covering your roots and essentially suffocating your plants.
We often focus on the fish as the reason for the filtration in the system, but the plants also have a role when it comes to suspended solids production in your deep water culture troughs. That’s why it is vitally important to aerate your system beyond just the fish tanks. As plants grow, they slough off root cells and produce root exudates through photosynthesis feeding bacteria which grow in the system troughs. Without some form of turbulence in the trough, the organic matter will continue to build up away from the primary filtration in your system.
In our experience, airstones placed every 4 feet in the deep water culture troughs helps to ensure there is enough oxygen getting to the plant roots and also provides enough turbulence to suspend the solids, which will eventually be captured by the filtration to keep your water clear.
Keeping the crud out of your troughs allows you to keep a consistent DO and assists the beneficial biology to stay healthy and do their jobs more effectively providing more nutrients for your plants to grow healthy nutrient dense produce. When designing or redesigning an aquaponics system, make sure you remember to aerate your troughs.
Microbial Ecology of our Aquaponics System
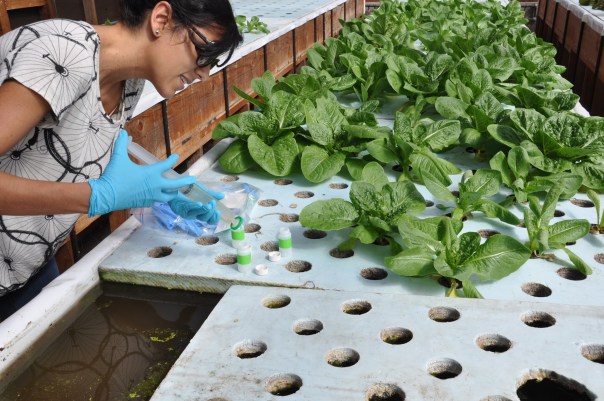
Angela Detweiler takes sample. Photo by Sander Van den Groenendaal
Learning more about the microbes in our aquaponics system and how we can improve or encourage those actors to do their jobs more efficiently has always been a goal of the Symbi Biological program. Put another way, we’re talking about the microbiome and microbiome eco system services that are performed. We know that there are certain nitrifying bacteria doing most of the heavy lifting in aquaponics, but what others are present and what role to do they play in nutrient cycling?
We volunteered to provide samples as part of a very exciting NASA study of the microbial ecology of food production systems. Scientists from the Microbial Ecology / Biogeochemistry Research Laboratory at NASA Ames Research Center will determine the

Photo from nanporetech.com
microbiome of our aquaponics system Read More
Measure to Manage: Nutrient Analysis #5
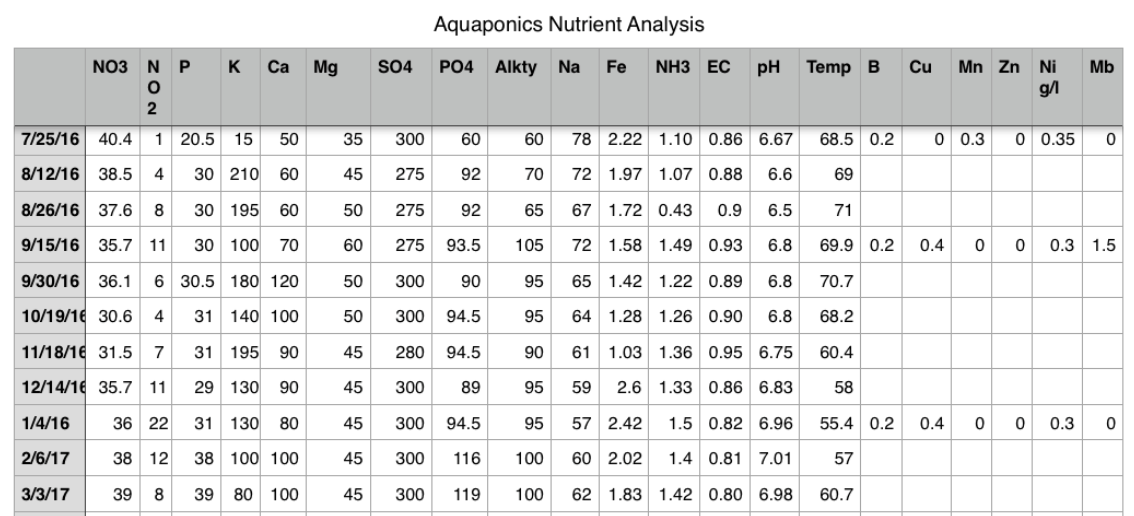
Every so often, I post our nutrient analysis of the aquaponics system water using a Hanna photometer. In the last 6 months, things have been fairly consistent except for the winter months. As the system temperature dropped below 57F, the nitrification slowed somewhat and the nitrite level jumped significantly. I think this was a result of both the cold system temperature slowing down the bacteria and a catfish tank that had fewer fish than I thought. Fish food was collecting in the tank and probably contributing to the nitrite issue as a result. I had been concerned that the catfish were not growing and decided to empty the tank to see what was going on in there. As it turns out, the catfish were almost the same size as when we started last year! Read More
Wormery Frogs Evicted

Last year, I started to notice an increase in Pacific Tree Frogs in the Wormery. At first, they were cute, but I did notice that my integrated pest management team of spiders and other critters of the worm bin were slowly disappearing. Back when I started the worm bin, we had a diverse group of insects and invertebrates. So many that it compelled me to make a video called Critters of the Worm Bin where you see all of the major players in a worm bin from a worm’s eye view at 10x and 15x magnification. Filming a pill bug eating a worm is still one of the coolest things I’ve ever seen.

Then about a year ago, it became obvious that making that film again would be next to impossible since most of the critters starring in their roles had disappeared. I don’t think they were on strike. They were gobbled up actually. Slowly, the frogs were beginning to take over the worm bin. Reluctantly, I’ve been gently relocating them outside where they belong. When I first noticed them, I figured they were eating some of the worms as I mentioned in a previous post. Upon further observation, I think they were eating a LOT of the worms! Not exactly surprising, but if you see frogs in your worm bin, I’d suggest showing them the wonderful natural habitat they already have or you’ll be raising frogs like me. And making fish food from frogs, well, I’ll leave that for someone else to try!
Surviving Not Thriving

Consistency is so important when raising any kind of organism for production. I’ve said it before on this blog, but it’s so important to have consistent inputs to expect predictable outputs. This is certainly the case with the crickets this morning. When I entered the cricket castle (okay, it’s a tent), it felt kind of cool inside. The thermometer showed it was 65F in the day time and the nights were getting down to 55F inside the tent… ahem, “castle”. It’s supposed to be about 84-88F, but one of the heaters had shut off on it’s own. As a result, the crickets have been surviving and not thriving. I use this phrase a lot when discussing the health of plants, but it works very well in this instance. Just because something is alive and looks “okay”, it may just be that the organism is close to it’s breaking point and has not presented the symptoms just yet. The little troopers were hanging in there, though. I was especially concerned with the new crop of babies as they are a delicate bunch. Everything seems okay with them, but they’re pretty small so it’s hard to truly know until they get a little bigger to see what the numbers look like. At these temperatures, breeding stops as I learned all too well back in September. The solution to this is to have a monitoring and alarm system that calls you when a set point is not being met. Or, for simplicity, just another reliable heater in the room. Although, if this is your livelihood, I’d highly suggest an alarm.

Recent Comments