 Symbi Biological
Symbi Moving Forward
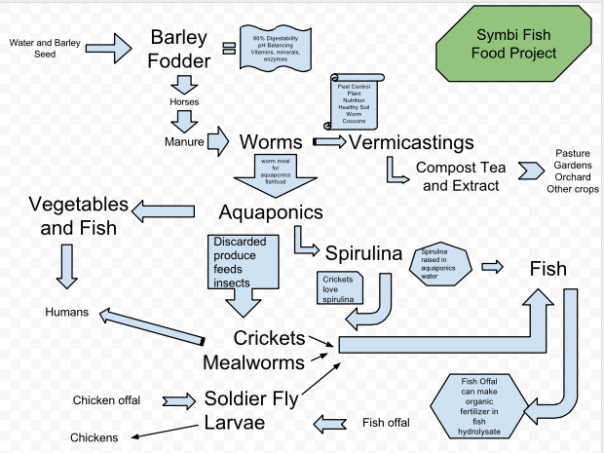
“So what do you feed the fish?”, she asked. I had just finished explaining how aquaponics was the perfect answer to recirculating aquaculture and hydroponics as it is an elegant system that solves the main issues of both production systems. She had a very good point, though. And that night, as I lay awake in bed thinking about that very question, Symbi Biological was born as I began to imagine a biological loop that we could create on the ranch where we work. That loop has been what I’ve been working on the last couple years while also working on projects for the TomKat Ranch Educational Foundation helping with regenerative agriculture strategies.
Over the past few years, Symbi Biological has worked on a number of different subjects to solve problems in a public way so that others could learn from and share these experiences. Some of those projects worked out really well, like the crickets, and others… not so well. However, in either case I believed it was important to document my experiences and share them openly. My ultimate goal with Symbi is to de-risk some of this stuff so others can replicate it with confidence when it counts.
All that said, we are in a pretty critical moment right now when it comes to our climate and it is more important than ever to build our understanding on how we can do a better job of stewarding the planet. Symbi’s parent organization, TomKat Ranch Educational Foundation, has asked that I focus my time over the next couple years on helping them discover and share the agricultural practices that offer the most promise for growing a regenerative food system that feeds us all and sustains our planet. Please visit the tomkatranch.org website to follow the exciting applied science projects and data that are helping point agriculture in a new and inspiring direction.
This blog will continue to publish mostly about aquaponics and insects as I can fit them back into the schedule. I feel it’s important to share this information with you so that you know why some projects are on hold. It always frustrated me when I would find blogs that I liked and then they would just stop posting with no explanation or even if the project worked or not. Or they would sporadically post. I hope to someday soon continue working on other food issues like the Fish Food Project, but for right now, I have a goal of educating the public about the importance of regenerative agriculture. So if you’re new to what I’m talking about and want to learn more, please join our great team at tomkatranch.org. You can always reach me at doug@tomkatranch.org. Thanks for reading and I look forward to producing more content very soon!
Cricket Harvesting Tip

Temperature is a vital part of cricket production from consistent harvests all the way to your financial bottom line when it comes to heating costs. One place where temperature seems to be a big help is for harvesting our crickets. If it’s possible to cool your cricket bins prior to harvest, the crickets move much slower and are easier to collect. I use the word “collect” here on purpose. “Collecting” sounds a lot more appealing than “catching” doesn’t it? This is especially important if you’re using a low tech method of harvesting like the Hopper Hopper. My first attempts at hand harvesting were comical, but when I left the bins outside of the production tent overnight at about 55F, they became much easier to collect.
Cricket Production Costs
Here are the costs for cricket production. Full spreadsheet after the page break. It costs $7.21 to produce one pound of cricket in the system that I use. The system includes a bin, two mudpies made from 5 parts coconut coir and one part worm castings. Each bin gets up to 6 egg crates as they grow to provide a place to hide out and do cricket-like things. At peak production, I had 55 bins, but moved down to 40 bins so I could keep some sanity. I was starting to hear crickets 24/7. And it wasn’t because of my bad jokes. <chirp chirp chirp>…Hey wait a minute!
I’ve played around with supplementing their feed, but in the end I came to the conclusion that to make this project work predictably, using organic non GMO peanut based chicken feed crumbles was the best option to figure out the production side of things. I hope to someday be able to back out the chicken feed crumbles for something we can grow on site like spirulina and aquaponics vegetables. They really like that stuff! I also think there is a lot of promise with fermented feed as I experimented with last winter.
For the feed, I pay $21 per 50lb bag of organic peanut based chicken crumbles. That’s $0.000925/ gram. The first week when they are tiny they get a cupful and that lasts about a week. Then I add another as they get bigger and that lasts a week. I check twice a week and, if need be, I add. By week three they are eating more and I am able to feed twice a week.
Each bin uses a total of up to 6 egg cartons at $0.16 each.
Each bin has two “mud pies” from coco coir and worm castings. We have worms to make our own castings. As mentioned above, the ratio is one part castings to 5 parts coco coir. The retail cost for both is about the same when considering proportions used. Each mud pie has 22 ounces of “mud” for laying eggs and for drinking water at a cost of $0.11 per bin. I believe the castings are a very important component as they add microbe meals for the babies to get a good start.
Electrical costs are $0.15 per KWh which means about $84/ month in heat. This is where your mileage may vary the most. This cost can be reduced if I insulate the cricket castle a little better as it really is just an indoor grow tent in an uninsulated garage.
For labor, I went with the California minimum wage of $10/hour to do the weekly chores of adding water, vacuuming out frass(cricket poop), and adding feed as it does not require much skill. There is some decision making involved, but it isn’t too incredibly hard.
There are certainly better systems out there. This one is pretty low labor, which is why it evolved this way. Given unlimited time and resources, I would design it a little differently doing away with the bins entirely and going with high walled perforated metal table tops and adding an automated drip water system. There would be collection trays under the tables that you can pull out like a drawer to clean the frass. I’ve had so many escapees in the tent that I’ve learned the bins are almost unnecessary. The crickets all inevitably end up hiding in the stack of new egg crates that I keep in the tent. I think you can have a more controlled environment by getting rid of the bins, since currently, with the bins you have 40 different microclimates to manage instead of one big one. I also think this could be done in a hoop house, too, with the right modifications. I’ll get back to you on that one. 😉
Water Usage and Rainwater Collection

We made it! Back in May, I posted about the aquaponics water usage and how efficient our aquaponics system operates. It’s exciting to prove that food can be grown in places where water and/or arable land is scarce even if we have a fair amount of both here on the ranch. I’ve mentioned before that our well water is extremely high in sodium with the most recent sample at 240ppm. It actually went up from the 200ppm reading a couple of years ago. This makes it hard to grow quality crops making rainwater collection very appealing. The recent drought is another reason why rainwater collection is an important consideration for everyone in our region. So last October, we installed some tanks and they worked beautifully. In fact, so well that we made it through the summer. Thankfully, we got a good 2.5″ rain last weekend that started recharging the tanks for this season. Something very important to point out is that I disconnected the tanks from the rooftops for the first half of the rain to wash off the all the dust that collected on the rooftop. Cleaning out 5000 gallon tanks just doesn’t sound like a lot of fun and from a food safety perspective, this is a good preventative practice.
Per the numbers below, the system used 3,888 gallons of water since the end of April. I can’t recall when our last rain was, but somewhere around that time. This is really interesting because that averages out to about 25 gallons per day for the entire system which is consistent with my reported usage last year! Consistency in science is always reassuring.
Aquaponics Water Usage in gal:
| 4/27/16 | 337 | Filter flush | rain water |
| 5/2/16 | 80 | rain water | |
| 5/11/16 | 116 | rain water | |
| 5/17/16 | 360 | Filter flush | rain water |
| 5/23/16 | 280 | Filled system full | rain water |
| 6/1/16 | 150 | rain water | |
| 6/15/16 | 585 | Filter flush | rain water |
| 6/29/16 | 400 | Filter flush | rain water |
| 7/13/16 | 180 | rain water | |
| 7/22/16 | 80 | rain water | |
| 7/27/16 | 130 | rain water | |
| 8/2/16 | 310 | Filter flush | rain water |
| 8/19/16 | 75 | rain water | |
| 8/26/16 | 365 | Filter flush | rain water |
| 9/16/16 | 140 | rain water | |
| 9/26/16 | 200 | Flush/Very hot days | rain water |
| 10/10/16 | 100 | rain water |
Worms Go to School
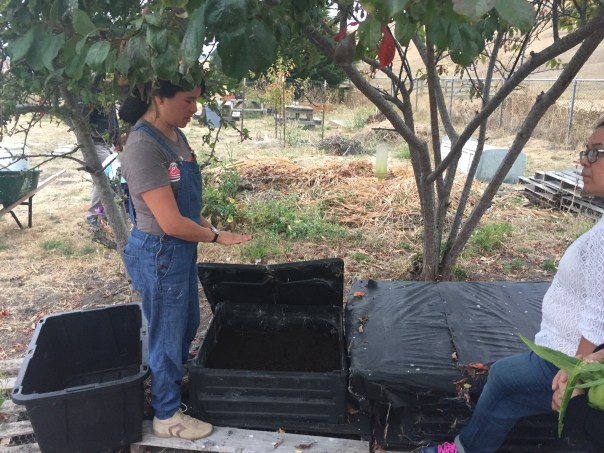
Last week, I got to participate in a composting workshop at Pescadero Elementary School sponsored by the San Mateo County Office of Sustainability and Puente, which is a fantastic local organization that believes “every member of our community deserves opportunities to learn and grow.” They are a tremendous partner to our local region providing educational workshops and health fairs to an area that doesn’t have a lot of services typical of most communities. We’re pretty rural with the coast on one side and the Santa Cruz Mountains on the other. Puente helps residents fill in the gaps where needed.
For the vermiculture portion of the workshop, our friend Mona Urbina from Pie Ranch who happens to be the Garden Coordinator for the school, reached out to see if I might have some extra worms. The great thing about a wormery that stays 70F all the time is that the population doubles in about 30-40 days. So of course, we had plenty of worms for the school!
For the “new” bins, they are essentially a small 3×3 raised bed with wire mesh on the  bottom to prevent critters from sneaking in to raid the feedstock or gobble up our worms. For the frames, Mona found some old compost stacker units that break apart perfectly to make the raised beds. Jack Johnson would be so proud of this project because now we’re hitting the three R’s. Reduce, Re-use, Recycle! Reduce, Re-use, Recycle!
The best way to start a worm bin is to stock it with around a half a pound to a pound of worms per square foot, which is 500-1000 worms/sq ft. Having this population density ensures that the worms will encounter each other regularly enough to procreate at close to optimal rates when the temperature is consistent. These bins are outside, so the temp will fluctuate a bit and we will have to be careful with feedstock additions as the worms get settled. I probably should have brought them some extras winter coats, too. Currently, the bins are under some shade since it’s been kind of warm lately. As we move further into Autumn, soon we will move them out into the sun so they can get some warmth from the solar gain and balance out the temp from the cooler nights. I will be experimenting with something outside like this as well, since our wormery is going to move from it’s current location. I remember when I first picked up our worms, Jack Chambers of Sonoma Valley Worm Farms had many of his bins outside with a little canopy over each reactor (bin) to protect the worms from direct sun. His climate gets warmer temps than we do so I think the temp balances itself out from day to night maybe around 65-70F. I think we will give it shot outside here in our region so we can provide the right advice to the local community and you, our readers! If we need a little extra heat, there are creative ways to warm them up.
One thing I’ve learned over the years is, kids love worms and insects. 
Temperature and Breeding Crickets

Controlled environment agriculture is appealing due to its predictability since you are in control of most of the parameters important to the growth of whatever it is that you are raising. Good monitoring and alarms, if you can set them up, are critical to your success. All that said, sometimes stuff just breaks or gets bumped and the settings can get out of the ideal environment. We had a little incident where the thermostat got bumped and the nighttime temp in the cricket castle was getting down to the mid 60’s while the daytime temp hovered just below 80F. All of this happened while I was on vacation, which is a fairly typical time for things like this to occur. The crickets are fine and they are growing nicely, but the mating just plain stopped due to the low temps. They need it to be around 84-90F for the romance to begin. It took a good 2 weeks before I started seeing eggs laid in the mudpies after my return. Now they are laying them like gangbusters. It’s like they were building up inside and now they have to be released! Holy mackerel, I have twice the egg trays (mudpies) that I normally have. There’s going to be a baby boom coming up!
Digging in
Here’s a time lapse video of some of our summer soil crew collecting soil samples. TomKat Ranch Educational Foundation apprentice Jake Tommerdahl and interns Rachel Sullivan and Didier Bolaños Gonzalez taking soil cores, bulk density, water infiltration, and deep samples (100cm) all in about 26 seconds! Very efficient!
Soil Sampling Pastures

Recently, a group of our awesome interns and one curious horse named Boomer joined me in the field to do some soil sampling. Our focus at TomKat Ranch is providing healthy foods on working lands in a way that sustains the planet and inspires others to action. Healthy soil has everything to do with healthy food. Soil monitoring is an important part of knowing if we are providing the best possible forage for our cattle. Healthy pasture plants means more ground cover (more plants) sending root exudates, which are food for microbes, into the ground increasing organic matter to actually grow soil. Yes, soil really does grow! As the soil organic matter is produced, there is more “room” to store nutrients for the plants to grow providing nutrient dense forage for the cattle. The reward being that a thriving pasture will sequester carbon in the soil simply through photosynthesis and well managed grazing.
Our on site ecologist team, led by Mel Preston of Point Blue Conservation Science and the Rangeland Monitoring Network already does yearly monitoring for us measuring specifically bulk density, organic carbon, water infiltration, and plant and bird diversity and abundance. This approach allows the RMN to link many different ranches around California providing a lot of data over a large number of ranches in an economical way. Making the testing easy and cost effective, the idea is to be able to get as many ranchers to participate as possible. A big thanks to RMN for loaning us some equipment and sampling protocol so that we can keep consistent with their highly appreciated work. You can see the data on our TKREF website.
Our purpose for going out in the field was to give our interns experience in soil sampling with full elemental analysis of the soil plus biological testing using PLFA and Haney Tests. PLFA stands for phospholipid fatty acid and gives us an account of the soil community and it’s abundance by analyzing phospholipid fatty acids that help identify certain groups by testing for their PLFA biomarkers. The Haney Test measures the microbial respiration and the organic extractable carbon and nitrogen, which is a fancy way of saying it measures how much the microbes breathe and how much food they have down there. Basically, it gives us an idea of how many good guys are hanging out at the party and how much beer and pizza they have to keep it going.
While costing a little extra, conducting tests more than once a year gives us a better understanding of our management practices and whether or not they are having the desired effect. If we do happen to increase our water holding capacity as expected through planned grazing, we could see a response in the soil biology as a result giving us valuable feedback.
Gaining an insight on how our soils are balanced and the biological activity will help inform the Land and Livestock Team to make the right decisions in managing the herd. We will begin sampling this summer and continue with the full regimen when the RMN crew does their annual sampling later this year.
See below for soil sampling protocol: Read More
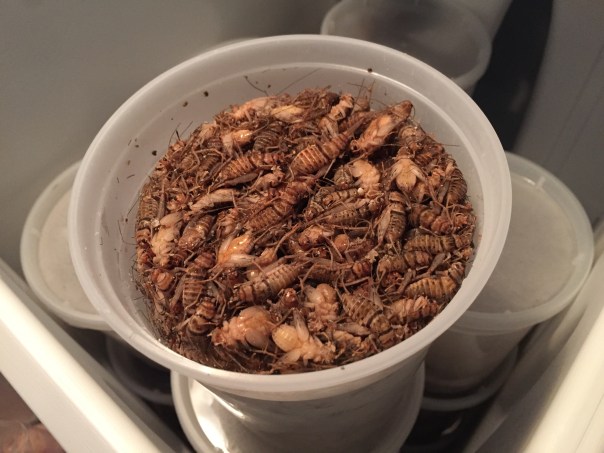
Cricket Harvesting Improved

Sort of looks like some kind of Soapbox Derby car or a baby stroller doesn’t it? It’s called the Brookwood Worm Sifter and it was made to separate worm castings from worms. The original machine was designed to separate horse bedding from manure, but they found with a few modifications it could also be used for worm castings. When it is used for that purpose, it sifts out some beautiful, uniform castings that can be bagged up and sold at the local farmers market or garden center. It works pretty well for it’s intended use. I originally purchased it hoping that I might be able to find a good way to harvest clean worm protein. I’ve come to the conclusion that harvesting clean worms is a lot of work even with a fancy machine like this. The machine always has some castings that come with the worms, which isn’t a big deal if you are selling the worms to other vermicomposters. It gets tricky when you want to clean the worms and use them for a pelletized fish food, though.
So while it works well for it’s intended purpose,  I thought maybe it might be a better cricket harvester so we added some mesh over top of the unit. I have to say, it really works well.
Combined with the Hopper Hopper 2.0, I can collect clean crickets and freeze them all in a reasonably quick period of time.
The unit works by using a perforated mesh surface at an angle and then shakes back and forth to sift out the frass (cricket poop) and sends the crickets down the line into a bin at the end of the machine. This machine has saved me so much time! It’s really been a huge help in collecting the crickets. I’m up to 5.5 pounds of raw cricket per week now and it would take me forever to harvest that kind of volume by hand.
Grinding Away

Grinding crickets to make a flour seems like a simple idea. Just get a grinder and grind ‘em, right? Getting the right grinder is obviously important and I thought I’d give some common grinding options a try before committing the dollars to a hammer mill, which is a little more industrial and probably what I need long term. Let’s see if we can get by using stuff you’d find on the shelf at the local store. For the record, I do not recommend making any alterations to the equipment.
We started our foray into flour with a Wondermill, which I have to say, is solely made for grinding grain and nowhere in their documentation do they claim anything about being able to grind crickets. We tossed a handful of crickets into the hopper and most of them got stuck right away due to the little safety dome that covers the opening to the grinder.


We sort of figured that would be the case and promptly removed that piece. Probably can forget the warranty, huh? After removing that piece, the crickets went into the grinder opening much easier only to get caught up on what is probably another safety design feature. There is the little opening in the hopper which leads to a plate and the grinder hole is off to the side of the hopper hole. I presume this is because if someone should happen to remove the safety dome for some crazy reason, they wouldn’t grind their finger tips off by putting them in the hopper hole. Good idea for grains. Not so good for cricket grinding since they got stuck so easily. What we needed was a pre-grind. Coffee beans are oily and about the size of crickets, so maybe that could be the trick?

The coffee grinder worked really well as far as a pre-grind process goes. I imagine this fine of a grind would do for some types of culinary dishes, but for a fish pellet, I’m looking for more of a flour-like consistency. 
After taking the ground cricket from the coffee grinder and putting it through the Wondermill, we ended up with a very nice flour!
So it worked pretty well. Next step is to see how long it takes to grind the many pounds of crickets that have been piling up and then start mixing up some some fish food batches!

Recent Comments